Problems with the scroll saw's tension? You aren't the only one. Many people have trouble determining the correct blade tension for flower designs on their scroll see. This article will explain how to identify each component and the differences between blade tension, stacking, and lock. You'll be able to identify each component of the scroll saw and adjust the tension to create flower patterns by the end.
Adjusting the blade tension to create scroll saw flower designs
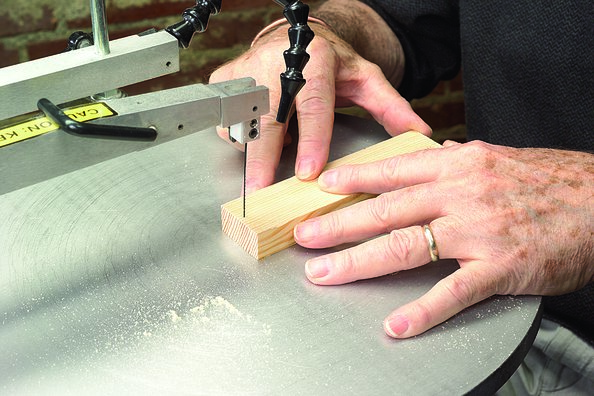
The right blade is crucial when using a scrollsaw. Also, adjust the tension. If these two things are not properly adjusted, the scrollsaw will stop working and not be able to cut the wood. The blade may be in any style, but the tension setting should match the design. Many scroll saw manufacturers have their own methods of adjusting the tension. Refer to your manual for the most detailed instructions. Here are some helpful tips.
First, make sure that the table is square with the blade. You can do this with a small square or a protractor. Moreover, the scales on your scroll saw's blade-tilt will not be accurate. It is therefore important to regularly check their accuracy. After setting the blade tension, cut the flower designs. You should not tighten the blades or make them too loose.
Stack cutting
You can create a scrollsaw flower pattern by stacking pieces of wood together. Double-sided tape is used to secure the pieces. Some scrollers use small nails or toothpicks to secure their stacks together. Staples and old circular saw blades can be used as binding tools. This will prevent the layers from shifting. Once each layer is attached to the other, you can begin cutting.
Magnification is a great option for precise cuts. A magnifying mirror mounted on the scrollsaw, or a tool lens, is useful. For a better illumination of your work area, you can consider purchasing a magnifying led work light. Some work lights include a magnetic or clamping base to make it easier to move your work area. There are many different types of scroll saws on the market. Choose one that suits your needs.
Lock your workpiece feet

There are several options when choosing the right drop foot for your scroll saw. The foot must be properly placed on the workpiece. It should not drag. After every adjustment, make sure that the foot lock of your workpiece is secured. Next, turn the speed adjustment knob to the desired setting. This will depend on the material to be cut, how thick it is, and how many teeth the blade has. Lastly, make sure that the workpiece is secured in the drop foot.
Scroll saws may not be the right tool for every job. These are tools that are designed for specific tasks. To cut a flower pattern out of wood, use the workpiece footlock to keep it from moving while you're cutting. This will prevent the workpiece from moving while you are cutting. You should also consider how much weight you intend to use for the cut. You might consider buying a bigger blade if you intend to cut large flowers.
Identifying the components of a scroll saw
Scroll saws can be classified by their throat size. This is the distance between blade and rear frame. The throat size dictates the size of the wood that can be cut. Smaller saws tend to have a shallower throat, while larger industrial saws can have a deeper throat. Before computers were invented, industrial saws could be used to cut larger objects. For most home projects, however, a simple scroll saw will suffice.
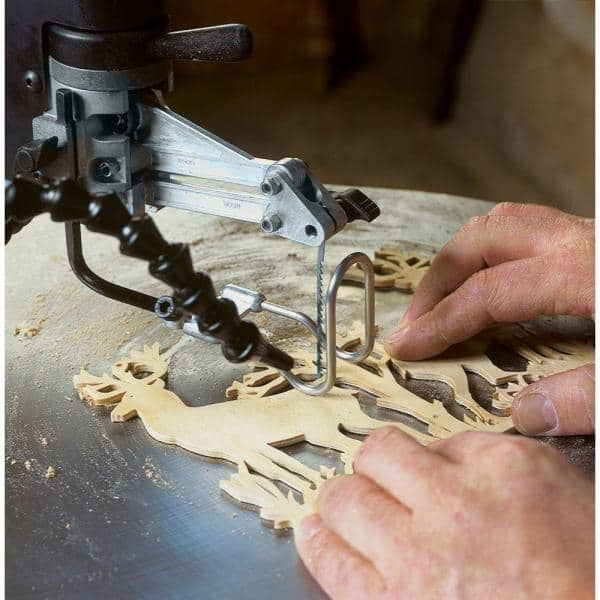
Download a free pattern for a flower scroll saw if your not sure how to start a project. These patterns include detailed instructions for how to make them. These patterns can be used to decorate your home with beautiful ornaments. You can also use them in your classroom or kitchen as a decorative item. You can also make practical items with scroll saws. It can be hard to identify the parts that make up a scrollsaw flower arrangement, but it's possible!
FAQ
Which wooden products are most popular?
The best-selling wooden items are those which have been made from wood that was harvested sustainably.
Most furniture is made from oak, maple, mahogany or walnut.
These woods are strong and durable, with beautiful grain patterns. They also last for many years if cared for properly.
Wooden furniture should always be painted first to protect against moisture damage. This applies to all surfaces, even drawers and doors.
You want your furniture to last as long as possible so you need to choose a paint that is water resistant.
You should use a high-quality oil-based primer followed by two coats of top coat. Depending on the amount of wear, you may need several coats.
Avoid spray cans or aerosol colors. These products contain solvents which evaporate quickly and leave behind harmful fumes.
How can a novice woodworker make it big?
Many people are starting to learn how to build furniture because they want to start an online business. However, if you're just getting into furniture building, there are other options than selling on Etsy. You could also sell at craft fairs, or other local events. Or you could offer workshops for others who want to learn how to build their own furniture. Consider offering your services if you have previous experience as a builder or carpenter.
Do you have any tips on starting a woodworking business?
It is hard work to start a woodworking company. You won't mind working hard if your hobby is something you love. You'll enjoy the challenge and rewards of owning your own business.
One thing to keep in mind when launching a new venture is that you might encounter unexpected problems along the way. For instance, you might run out of money unexpectedly. Perhaps customers won't pay you as much as you had hoped. Preparedness is key to survival in such situations.
Set up a separate account in your bank for your business. You'll know exactly how much money is coming in by setting up a separate bank account.
What kind of tools are used to carpenters?
Carpenters most often use a tool called a hammer. A hammer helps to carpenter pound nails into the wood. This helps to keep pieces together when they are working on a project. Other tools include clamps. pliers. screwdrivers. measuring tape. pencils. saws. drills. wrenches.
Can this be a way to make money?
Yes! Many woodworkers are already doing so. According to the U.S. Bureau of Labor Statistics in May 2012, the median annual income for woodworkers was $34,000 This is significantly higher than the national average, which is $31,000 per year.
What time does it take for furniture to be finished?
It depends on what size piece of furniture you have. You can finish smaller projects, such as boxes or picture frames, in one day. Larger projects like tables and desks take many days. It takes time to stain and seal the wood properly.
How can I learn basic woodworking skills
Building a bench is a great way to get started in furniture building. This project can easily be done using whatever wood you have at your house. If you are unsure what type of wood is best, you can get cheap pine boards at Lowes (or Home Depot) instead. Once you have built your bench, you will need to sand it off and then finish it with a stain/varnish.
Statistics
- Woodworkers on the lower end of that spectrum, the bottom 10% to be exact, make roughly $24,000 a year, while the top 10% makes $108,000. (zippia.com)
- Average lumber prices rose about 600 percent between April 2020 and May 2021. (familyhandyman.com)
- Overall employment of woodworkers is projected to grow 8 percent from 2020 to 2030, about as fast as the average for all occupations. (bls.gov)
- Most woodworkers agree that lumber moisture needs to be under 10% for building furniture. (woodandshop.com)
External Links
How To
How to make wood joint
This tutorial will show how to join 2 pieces of wood together. We will use the "pockethole joint," which means that we drill holes in the wooden pieces and then glue them together. If your wood has a straight grain, smooth surface, you can use this method. You might consider dowel joinery if your wood isn’t straight or flat. Here are the steps
-
Drill Pocket Hole Joints. Start by measuring and marking the spot where the pocket hole joint will be placed. Next, drill 3/4 inch holes in each end of each piece using a handheld drilling machine or jigsaw.
-
Sand Smooth. Sanding the wood's edges will help ensure that the joint won't split later.
-
Glue the two sides of the wood together. Apply glue to both sides of the wood. Allow it to sit for approximately 5 minutes before you clamp the pieces together.
-
Connect the pieces. After the glue has dried you can attach the pieces to form a flush joint.
-
Trim Joinery. Trim any excess wood surrounding the joint once the glue has dried completely.
Be sure to leave enough space between each piece so that they can be turned inside-out.