The decorative detail known as fretwork can be found in Victorian homes. The period's elegant interlacing designs and intricate woodenworking techniques are still recognizable. This sourcebook contains elaborate plates with authentic patterns for fretwork, finials, banisters, interlaced vines, foral carvings, and scrollwork. The book offers detailed instructions about how to prepare your Scroll Saw for fretwork.
Creating victorian fretwork patterns
For any project, fretwork patterns can be used as a classic choice. This detailed guide includes detailed instructions, photos and full-size shades, as well close-up photos. These patterns are still very popular and can be found on furniture, bedding, and rugs. Fretwork patterns are a great way to add elegance to any room, in addition to tables or cabinets.
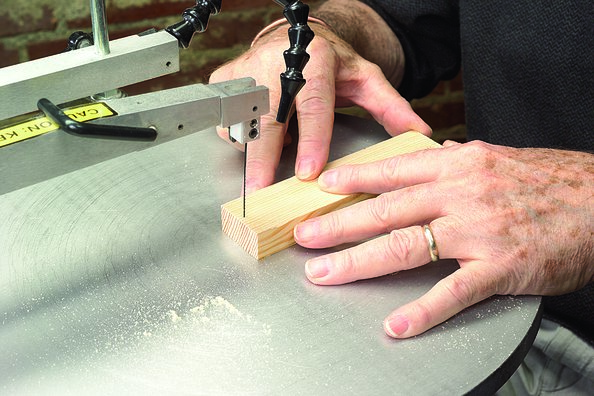
Preparing the scrollsaw to do fretwork
It can seem daunting to begin fretwork if you are a beginner in woodworking. However, once you have the right tools, the process is quite straightforward. Traditionally, this type of work was done with handsaws, but scroll saws have made this process much easier. Scroll saws are equipped with a blade that can be taken off, making it possible to create different patterns from wood sheets and panels.
First, drill starter holes in the scroll saw. Starter holes are approximately a quarter inch apart from the scroll's inner edge. These holes are made using a 5mm bit drill. Once you've drilled the starter holes, you'll be ready to cut the wood pieces.
Once your scrollsaw blade is sharp enough that it can cut the desired size and shape, you can start carving. Marquetry, a form of woodwork that involves attaching different colored wood veneers onto a wooden surface, is called marquetry. Marquetry requires skillful woodworkers as it is an art form. This type of woodworking should not intimidate beginners. You can still create stunning pieces for your office and home with a scrollsaw.
Victoria Fretwork Cross

While fretwork is a common term, you may not have considered making your Victoria Fretwork Cross. These cross-shaped ornaments can be framed or displayed in bright sunlight. These easy-to make projects have stunning curves and scrolls. They are also simple to install. Wood veneer is a good option because it's affordable and reliable. There are many styles of fretwork, including both geometric and whimsical.
You can also make a basic Victoria fretwork Cross from parchment paper. But you need to be able bend it in this shape. Taper the masts up and point the cross spars on each end. To cut your pieces, use a fretsaw. Then paint them. You should finish your piece by adding a red cross to help you identify it. Follow all instructions.
FAQ
What is the difference between a hobbyist or a professional woodworker, and how can you tell?
Hobbyists enjoy creating things out of wood. Professionals tend to focus on the quality. Hobbyists are proud of their creations and will often share them with family members and friends. Professionals will spend hours researching designs and then begin to create a project. They will pay attention to every detail, from selecting the best materials to finishing the project perfectly.
How do I know what tools are best suited for me?
It helps to reflect on your needs and preferences before you shop for tools. Do you prefer metal or plastic handles What size screws or nails do you prefer? Do you prefer hand tools over power tools?
Are there any other things I should know regarding woodworking?
It is easy to underestimate the amount work involved with furniture construction. Finding the right type of wood is the most difficult aspect of this process. It can be hard to choose from the many types of wood that are available.
A problem is that wood doesn't have the same properties. Woods can warp, split, or crack over time. These things should be considered before you buy wood.
How can I keep my shop organized?
To keep your workshop tidy and organized, you should first create a place for tools storage. To keep your tools sharp and ready for work, keep them clean of dust and debris. Use pegboard hooks to hang tools and accessories.
Statistics
- Most woodworkers agree that lumber moisture needs to be under 10% for building furniture. (woodandshop.com)
- If your lumber isn't as dry as you would like when you purchase it (over 22% in Glen Huey's opinion…probably over 10-15% in my opinion), then it's a good idea to let it acclimate to your workshop for a couple of weeks. (woodandshop.com)
- The best-paid 10 percent make $76,000, while the lowest-paid 10 percent make $34,000. (zippia.com)
- Overall employment of woodworkers is projected to grow 8 percent from 2020 to 2030, about as fast as the average for all occupations. (bls.gov)
External Links
How To
How to stain wood
The process of staining wood involves the application of chemicals to the wood's surface, which causes it to change its color. This chemical reaction causes the wood color to change from white and brownish red. Oak is the most common wood type for staining. However, you can also use other wood types.
There are many ways to stain wood surfaces. One method involves mixing the stain and a solvent and then spraying it on the wood. Another method involves applying a solution of water to the wood. Stains can also be mixed into paints and varnishes, becoming part of the finish coating.
Preparing the surface is the most important step in staining wooden surfaces. Cleaning the wood thoroughly removes any dirt or grease that could interfere with applying the stain. Sanding can smoothen out scratches and uneven spots. The next step is to determine the type of stain you would like to use. There are two main kinds of stains available: non-penetrating stains and penetrating. Penetrating and non-penetrating wood stains penetrate deeper than other types, making them perfect for dark colors like mahogany. Penetrating stains are best paired with lighter colors, such as maple.
Once you have decided on the stain type that you want, get your tools ready. A paintbrush works well for applying stains because it allows you to spread the liquid evenly across the surface. You should also have some handy rags to wipe up excess stains after you finish painting. If you are planning to mix your stain, ensure you have enough containers for each component.
Once you have prepared your materials, start by cleaning the area where you plan to stain the wood. Use soap and warm water to remove dust and grime. Wipe down all furniture pieces with a dampened cloth and clean water. You should remove any debris, especially if your plan is to stain darker wood.
Apply the stain. Apply the stain by brushing or spraying it onto one side of the furniture. Slowly and carefully work your way along the grain to reach the opposite end. Be careful not to let the stain drip off the wood's edge. Before moving on to the next steps, allow the stain drying completely.
Clear polyurethane is used to protect the painted surfaces. Apply three coats polyurethane sealer. Allow the third coat to dry overnight before sanding the final coat.