There are many ways to lathe the sand. However, some people prefer a slower speed. Whichever method is best, you should know that sandpaper wears out over time and requires increasing pressure in order to cut the wood. This causes heat generation as well as a slick, scratchy finish. This article will discuss various sanding methods and give you a few tips to help you make the most of your lathe.
Sandpaper made of dull material can cause lathe sanding to be less effective
Here's a quick overview of the negative effects of dull sandpaper on your work. It makes your work less efficient by making the sandpaper grab the wood or contact the jaws of a chuck. This causes poor quality finishes and inefficient sanding. To prevent this problem, it's best to purchase sandpaper from a specialty shop. This is a striking difference.
Dry sanding papers are susceptible to tearing easily. This can lead to an uneven finish. The work piece could fly upwards and land on the operator's arm. Alternatively, it could get trapped against the sanding surface and sucked into the machine. Sandpaper with a dull appearance can cause lathe sanding to fail.
You should use finer grades of sandpaper.
Sanding a lathe can be done with progressively finer papers. Depending on the type of material you're working with, you can choose from 100, 180, and more. Each grit replaces the scratch created by the previous grit, and the next grit removes those scratches. The final grit is 400. Many turners recommend hand-sandpaper as the final sanding step. Compressed air can also be used to remove dust during the sanding process.
The coarser grits of sand paper remove the coarser sanding grades, but will leave a hazy sawdust or grit on your turning. Finer grits will get rid of finer scratch marks. Finer sandpapers will get rid of even the smallest details.
Avoiding clogs with lathe sandpaper
To avoid clogs, it is important to select the right grit for the job. Ask a local expert for assistance. You can also buy variety packets, which can be used with multiple grits. Below is a list of the various types and grit numbers of sandpaper. Aluminum oxide sandpaper is a good choice for general sanding jobs, and synthetic sandpaper is better suited for woodworking applications.
Floor finishes are another cause of clogs. Resins and varnishes can leave sticky residue on the floor, which can lead to clogs. It is important to choose the right type of sandpaper according to your finish. For light-duty, you should use sandpapers that have a higher grit. Finer sandpapers can be used for more heavy-duty work. However, they are more likely to clog and cause more scratches.
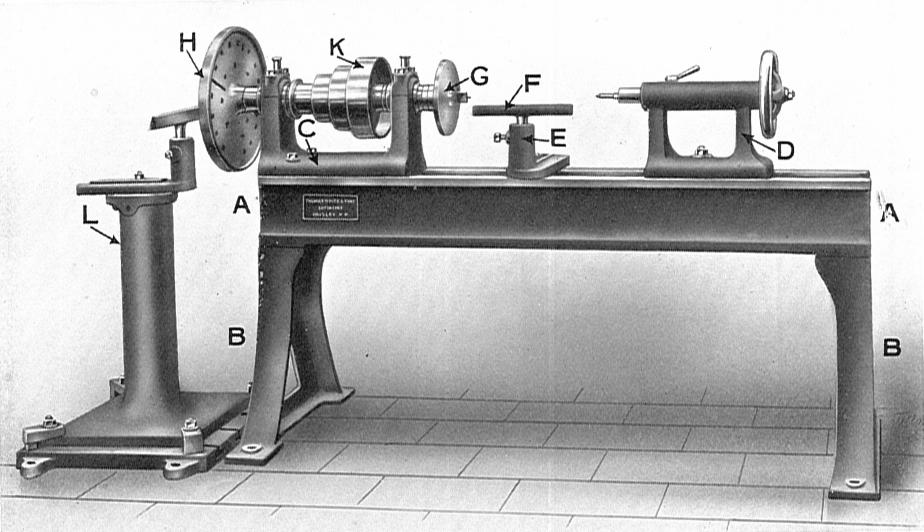
Using a sanding belt holder
The use of a sanding ring on a lathe helps to eliminate the risks and ensure safe and efficient sanding. A sanding belt holder fixes to the tool-case turrets of conventional lathes, and leverages the rotational movement of the workpiece. Available in 25 mm and 50 mm widths, they are compatible with a wide variety of belt diameters and can also hold different abrasion grits.
A roller stand or worktable extender can be used to support long workpieces or those that require extra support. The tilt lock should not touch or contact the belt. After you have installed the sanding holder, you are ready to start sanding. Once you are done with assembly, you can use your worktable extension to sand all surfaces of the workpiece.
Use a sherpa to sand the lathe
If you have ever used a lathe, you will know how easy it can be to slip a disc into the machine's Chuck and then lose it. A donut is a simple way to replace abrasive wheels. The donut can be attached directly to the tailstock by using masking tape. Donuts should be used with the backing facing out. Mark the abrasive disk halfway between the center of the disc and the edge. To cut the disc use a thin cutter.
FAQ
What kind of wood should I use?
The most popular types of wood used in woodworking include oak, pine, birch, maple, cherry, mahogany, teak, poplar, redwood, and bamboo. Each wood type has its own characteristics which affect the final product's appearance and feel. Oak tends to be harder and darker than other woods. Birch is lightweight and soft while mahogany is heavier and denser. You can also choose between solid wood and veneers. Veneers are thin sheets of wood that are glued together to form a single layer.
Where do I start with woodworking?
It is best to actually build furniture to learn how to make it. Although you will need to have tools and may make mistakes along your journey, you'll soon be able to master it.
Choose a project that interests you. It can be something as simple and small as a box, or large-scale as an entertainment center. Once you've decided on a project, find a local woodworker who specializes in that kind of work. Ask him or her for advice on what tools you'll need and where to find them. Perhaps you could ask if there is someone else who does this type of work.
How often should new supplies be purchased?
You will likely need to replace some tools over time. Hand tools will need to be sharpened regularly. You'll also need to replace parts if you use power tools. Spread your purchases over several months to avoid purchasing too many items at once.
Statistics
- The U.S. Bureau of Labor Statistics (BLS) estimates that the number of jobs for woodworkers will decline by 4% between 2019 and 2029. (indeed.com)
- If your lumber isn't as dry as you would like when you purchase it (over 22% in Glen Huey's opinion…probably over 10-15% in my opinion), then it's a good idea to let it acclimate to your workshop for a couple of weeks. (woodandshop.com)
- Overall employment of woodworkers is projected to grow 8 percent from 2020 to 2030, about as fast as the average for all occupations. (bls.gov)
- The best-paid 10 percent make $76,000, while the lowest-paid 10 percent make $34,000. (zippia.com)
External Links
How To
How to stain wood
Staining wood can be described as a process where chemicals are applied to the wood surface. This causes the wood to take on a new color. The wood will turn from white to brownish-red due to the chemical reaction. Oak is the most commonly used wood for staining, but other woods can also be stained.
There are several ways to apply stains to wood surfaces. Some methods involve mixing the stain with a solvent (such as turpentine) and then brushing or spraying the mixture onto the wood. Another method involves applying a solution of water to the wood. It is possible to mix stain into varnishes and paints, making it part of the finishing coat.
The first step in staining wood is preparing the surface. You must clean the wood well to remove any grease or dirt that might interfere with the application of the stain. Sanding smoothens scratches and rough spots. Next, you need to decide which stain you want. There are two main types of stain: non-penetrating and penetrating. Penetrating colors penetrate deeper into wood than those that are non-penetrating. This makes them more suitable for darker colors, such as mahogany. Light colors such as maple work well with non-penetrating stain.
You will need to decide on the type of stain you want to use, and then prepare your tools. You can use a paintbrush to apply stains. This allows you spread the liquid evenly over the surface. To remove any stains left behind after painting, you will need some rags. If you plan on mixing the stain yourself make sure that you have enough containers to hold the different components.
Once you have prepared all your materials, it is time to clean the areas where you will stain the wood. You can remove grime and dirt with warm water and soap. Use a dampened sponge and warm water to clean the entire piece. Be sure to get rid of all loose material, especially if staining is planned for darker wood.
Next, spray the stain. The stain can be applied by spraying or brushing the stain onto one end of the furniture. Slowly and carefully work your way along the grain to reach the opposite end. Make sure that the stain does not drip off the edge of the wood. Allow the stain to dry completely before you move on to the next step.
A coat of clear polyurethane sealing agent is applied to protect the paint. Apply three coats polyurethane sealer. Allow the third coat of polyurethane sealer to dry overnight before applying the final coat.